Friday, May 18, 2012

Home-made 4WD rooftop awning

This article describes how to build your own rooftop awning. I recommend that if you do want an awning, purchase one from a store. They have come down in price considerably since I built mine. If you do go ahead, make sure to check with your local transportation authority and check whether such a device is legal in your country/state.

Anyway, let's start. A while ago I wanted a rooftop awning but I didn't want to pay that much money. In Australia, these awnings go for several hundred dollars, and the small ones are indeed quite small. So I built my own, instructions are below. This is how it looks like:


Sometimes it's a tough life...

The ingredients are:
  • tarp with metal eyelets. IIRC mine is 2.4 x 3.0m (similar one)
  • 3m 25x25mm aluminium square tube (or width of tarp otherwise)
  • Two plastic caps for the square tube
  • Four 1.5 inch 3/8 bolts + nuts + washers
  • Four 2 inch 3/8 bolts + nuts + washers
  • Four poles, one crossbar, ropes, pegs
  • Wide (~5cm) velcro, 1 m is sufficient (makes 3 strips)

Most of the stuff I got from Bunnings, the poles from the camping store and the velcro from a textile store next to the BCF at Cannon Hill.

The basic design is simple. The tarp is held onto the square tube by a bunch of vertical bolts - one per tarp eyelet. The crossbar, which is too long for my tray, is held in place by two horizontal bolts, on the inside (towards the car). The tarp is folded in half, then rolled up and held in place by three strips of velcro.

Tarp when rolled up for transport.

I have Rhino Rack Aero bars and the bolts I got had a head exactly the size of the groove. So I don't need mountings, I simply push the screw into the groove, then sit the awning on it and tighten the nut up the top. And, second time lucky, the eyelets are the distance of my roof racks, so I don't have to do anything there either.


The bolt fits exactly into the groove - lucky me :)
Obscured by the rolled-up tarp is the top end of the bolt - simply a washer and a nut.

Assembly instructions


Drill a hole a few cm in from one ond of the square tube. Now take a bolt and nut, screw the tarp's corner to the tube. Stretch it to the other end, drill another hole, bolt, nut, done. The tarp should be tightly stretched. Now mark each eyelets in the middle for more holes. Take the tarp off, drill the remaining holes, then saw the excess square tube off.

Bolt shown from the side

As said above, my roof racks are exactly the distance of the eyelets, so I don't need extra mountings. The professional awnings have an L-shaped attachment that goes into the roof racks and the awning then hangs off the side. This photo shows the attachment, the same should be possible on this home-made model.


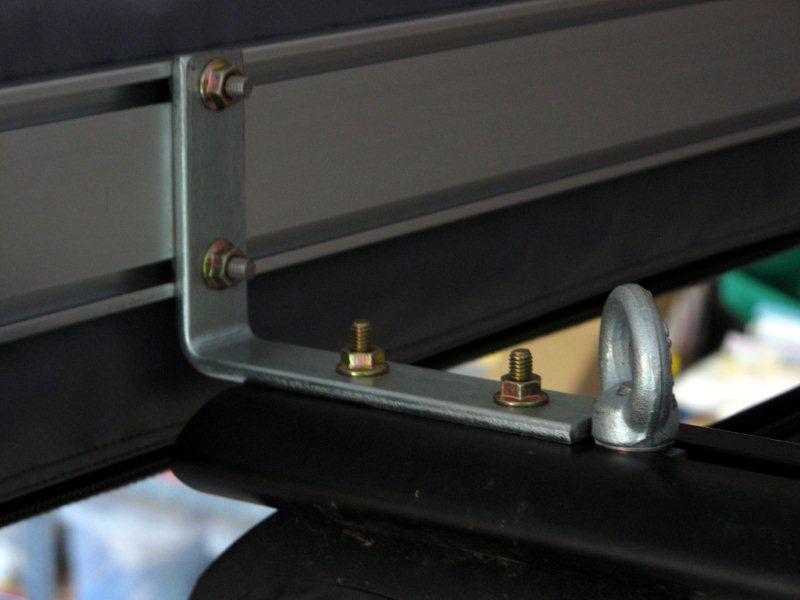
The final bit are two horizontal drillings through the tube. They are for mounting the crossbar next to the tube. I transport the four poles, the ropes and the pegs in the tray.

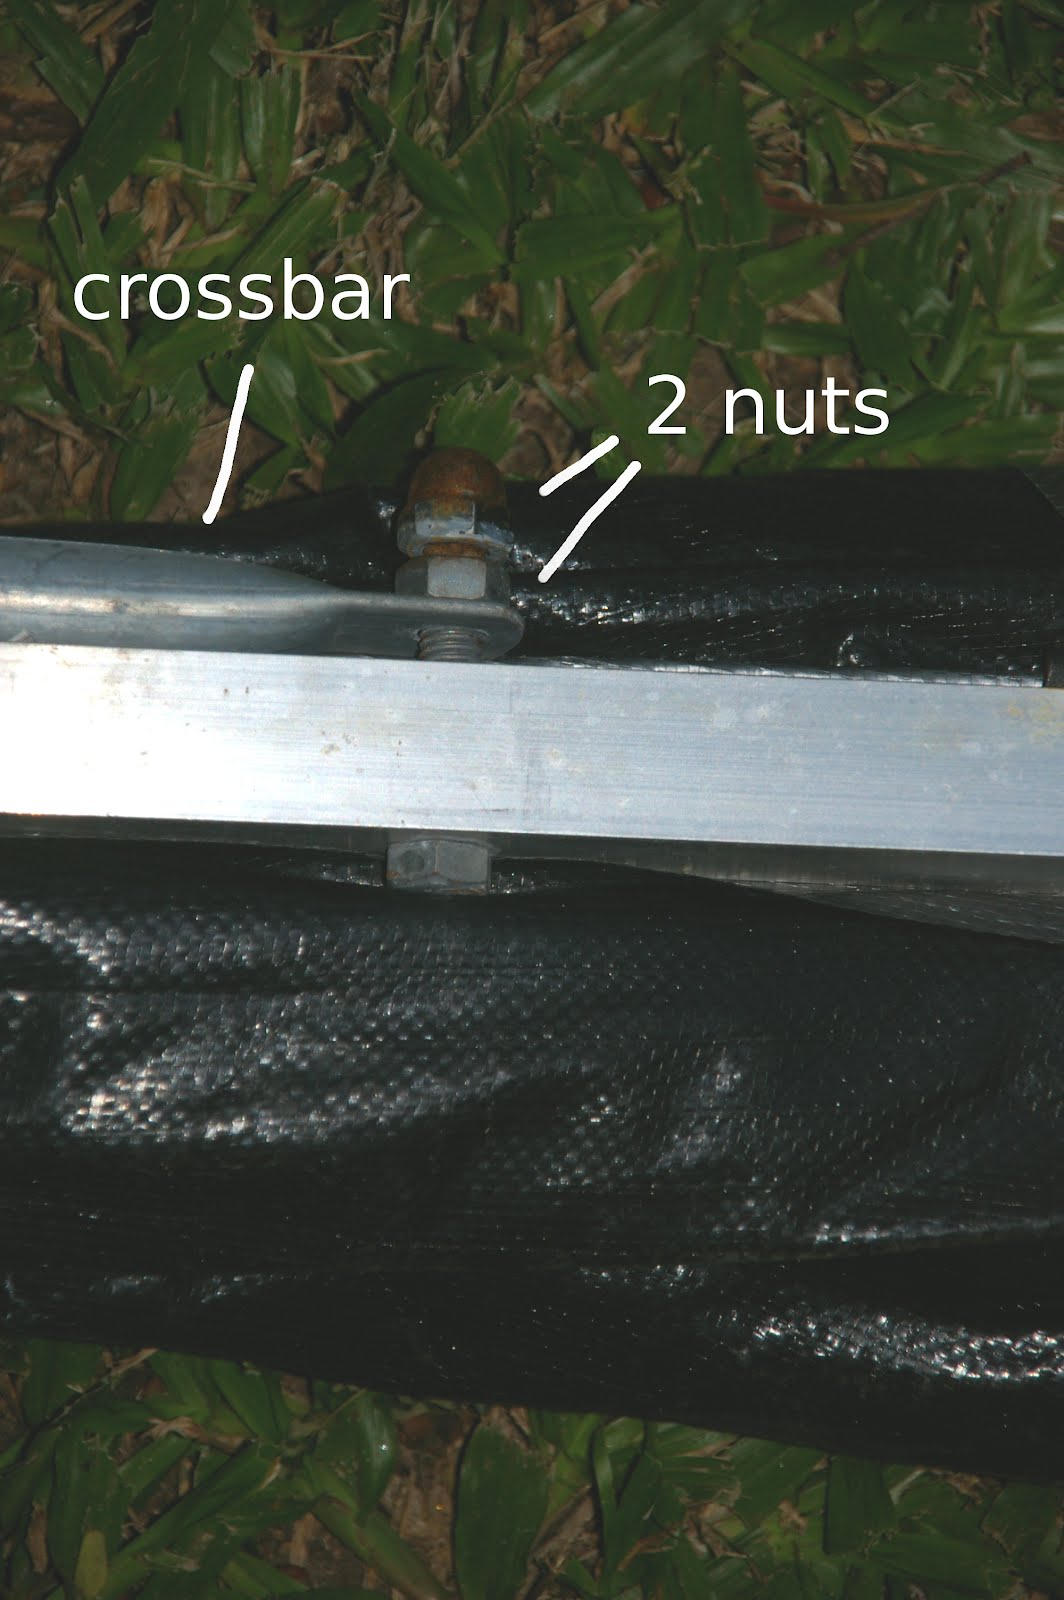
Crossbar mount. The bolt is horizontal when mounted.

The front bit of the rolled-up awning, taken from the other side of the car, showing the crossbar mount.

Setting it up is simple enough, though it does require 2 people. It takes a few minutes to set up, a few minutes to pack up again. If the tarp gives up, I can (hopefully) buy another one and replace it.

Costs for me was just over AUD 100, including the crossbar and the poles. If you already have those, you're obviously able to build it for much less.

Side notes

As I have the handyman's knowledge of a five-year-old, I did a few things wrong. First, Bunnings sells bolts in imperial and metric. Had I known that, I'd have bought metric screws. I ended up just getting the first set that matched the size I needed. The metric section was a few metres further down the aisle.

The first set of (round capped) nuts wasn't galvanised and started rusting (you can see it in the photos). Haven't been able to find galvanised ones for the imperial bolts, so I've since replaced them with galvanised normal nuts.

Pros and Cons

  • It's freaking awesome! Having a shady spot next to the car wherever you roll up is great!
  • The awning is big. Not much of an issue once it's mounted but it's pretty unwieldy in the garage.
  • The surface area covered is perfect for two people and a table, so no issues there.
  • The awning is not free-standing. I believe the commercial models are, but this one needs to be pegged down. Which means that moving the car once it's set up is a no-go, you have to tear it down.
  • The way I roll it results in rain collecting in the rolled-up tarp. I could roll it the other way, but that's a bit awkward. No big issue though, except after a good rain when you break at the first set of lights, a few litres of water will run down your windscreen :)
  • I can't yet claim how it will hold up in a typical Queensland wind or thunderstorm. I think it will be alright, but so far I've only had it up during light winds and light rain.

Thursday, May 10, 2012

Testing X servers from git

Every so-often I get asked the question of how to test the X server (or drivers) from git. The setup I have is quite simple: I have a full tree in /opt/xorg, next to the system-installed binaries in /usr. A symlink and some environment variables allow me to switch between git versions of the server and clients and the system-installed ones.

Installing the tree

Getting that setup is quite easy these days:
mkdir -p xorg/util
git clone git://anongit.freedesktop.org/git/xorg/util/modular xorg/util/modular
cd xorg
./util/modular/build.sh --clone --autoresume built.modules /opt/xorg
That takes a while but if any component fails to build (usually due to missing dependencies) just re-run the last command. The built.modules file contains all successfully built modules and the script will simply continue from the last component. Despite the name, build.sh will also install each component into the specified prefix.

You get everything here, including a shiny new copy of xeyes. Yes, what you always wanted, I know

Note that build.sh is just a shell script, so you can make changes to it. Disable the parts you don't want (fonts, for example) by commenting them out. Or alternatively, generate a list of all modules, remove the ones you don't want or need and build with that set only:

./util/modular/build.sh -L > module_list
vim module_list # you can skip fonts, apps (except xkbcomp) and exotic drivers
./util/modular/build.sh --clone --autoresume built.modules --modfile module_list /opt/xorg

Either way, you end up with /opt/xorg/bin/Xorg, the X server binary. I just move my system-installed and then symlink the new one.

sudo mv /usr/bin/Xorg /usr/bin/Xorg_old
sudo ln -s /opt/xorg/bin/Xorg /usr/bin/Xorg
Next time when gdm starts the server, it'll start the one from git. You can now update modules from git one-by-one as you need to and just run make install in all of them. Alternatively, running the build.sh script again without the --clone parameter will simply git pull in each module.

Setting up the environment

What I then define is a few environment variables. In my .zshrc I have
alias mpx=". $HOME/.exportrc.xorg"
and that file contains
export PKG_CONFIG_PATH=/opt/xorg/lib/pkgconfig:/opt/xorg/share/pkgconfig
export LD_LIBRARY_PATH=/opt/xorg/lib/
export PATH=/opt/xorg/bin:$PATH
export ACLOCAL="aclocal -I /opt/xorg/share/aclocal"
export MANPATH=/opt/xorg/share/man/
So running "mpx" will start git versions of the clients, link clients against git versions of the libraries, or build against git versions of the protocol.

Why this setup?

The biggest advantage of this setup is simple: the system install doesn't get touched at all and if the git X server breaks changing the symlink back to /usr/bin/Xorg_old gives me a working X again. And it's equally quick to test Fedora rpms, just flick the symlink back and restart the server. I have similar trees for gnome, wayland, and a few other large projects.

It also makes it simple to test if a specific bug is a distribution bug or an upstream bug. Install the matching X server branch instead of master and with a bit of symlink flicking you can check if the bug reproduces in both. For example, only a few weeks ago I noticed that xinput got BadAtom errors when run from /usr/bin but not when run from /opt/xorg/bin. Turns out it was a thing fixed in the upstream libXi but not backported to Fedora yet.

The drawback of this setup is that whenever the xorg-x11-server-Xorg module is updated, I need to move and symlink again. That could be automated with a script but so far I've just been too lazy to do it.

[Update 11.05.12: typo and minor fixes, explain build.sh -L]

Wednesday, May 9, 2012

vimdir for project-specific vim settings

Sometimes it feels that each project I work on has different indentation settings. Not quite true but still annoying. I don't know of a way to tell vim to auto-detect the indentation settings based on the current file (which, for X.Org projects wouldn't work anyway) but what has been incredibly useful is the vimdir script. It simply scans the directory tree upwards to find a .vimdir file and loads the settings from there. So I keep files like this around:
setlocal noexpandtab shiftwidth=8 tabstop=8
The alternative is to add a snippet to the file itself but not every maintainer is happy with that.
/* vim: set noexpandtab tabstop=8 shiftwidth=8: */

Friday, May 4, 2012

Copy/paste of code is not ok

Much too often, I see patches that add code copied from other sections of the same repository. The usual excuse is that, well, we know that block of code works, it's easy to copy and we immediately get the result we need.

This is rather short-sighted. Whenever code is copied, the two instances will go and live separate lives. Code is never static, over time that copy becomes a partial reimplementation of the original.

There are a few conditions when copy-paste is acceptable:

  • You can guarantee that the original code does not have any bugs and thus the copy does not have any bugs, now or in the future. Otehr

  • You can guarantee that anyone making changes to this code in the future is aware of the copy and the original and their respective contexts.

  • You can guarantee that the context of the original and the copy never changes in a different manner.

  • You are happy to reimburse testers and developers for the time wasted tracking down bugs caused by ignoring any of the three above.
If the above are true, copying code is ok. And you probably get some price for having found an impossible piece of code. In all other cases, write a helper function and share the code. If the helper function is to unwieldy, maybe it's time to think about the design and refactor some things.

Thursday, May 3, 2012

What's new in Synaptics 1.6.0

xf86-input-synaptics 1.6.0 was released today and it packs a bunch of changes. This post outlines some of these changes and future directions for the drive.

Clickpad support

Clickpads are touchpads without physical buttons. Instead, the user has to press the whole pad down to trigger a click. These pads are becoming increasingly common in laptops but need a bunch of software workarounds to make them useful with traditional interaction methods. I've got a post dedicated to Clickpad support in the synaptics driver, so best to read that for more details.

The important bit about clickpad support is that it's only available on multi-touch capable X servers. If you're running an older server, you won't see clickpad-y goodness. Sorry.

Smooth scrolling

Smooth scrolling is now supported by the driver as well. On XI 2.1-compatible servers (read: server 1.12 [1]), the driver will submit scrolling valuators instead of scroll events. This makes for a smoother scrolling experience on clients that support it.

We're in a transition period where clients start to enable smooth scrolling but many other clients don't support it yet. For now, we left coasting enabled by default in the driver to provide a consistent experience. This will likely be disabled once smooth scrolling support and client-side coasting becomes more prevalent.

Meanwhile, clients can disable it by setting the "Synaptics Coasting Speed" property to 0, 0.

Bugs, bugs, bugs

Luckily I was able to spend quite some time on synaptics over the last weeks to fix various bugs and I think this is the most solid release of synaptics in quite a while. A few bugs that you may have seen that have now been fixed are:
  • touchpad unresponsive after suspend  #49161
  • weird cursor jumps while dragging #48777
  • broken double-tap #31854
  • slow or too fast scrolling on pre-1.12 servers #46617
and a few more.

Future of synaptics

What becomes more and more obvious is that the driver is on the edge of being unmaintainable. Pushing new features into the driver always always means that some other feature is broken and sometimes we don't notice for months. Having around 75 options in the driver doesn't help here, testing all combinations is impossible.

I can't claim that I have big plans because I tend to get pre-empted by misc things all the time but the rough plan is to keep a 1.6.x series while re-doing some of the internals of the driver for the 1.7 release. Expect the git master branch to see a few big changes though.


[1] Ubuntu 12.04 ships a 1.11 with the 1.12 input stack, so the above applies to that server too.

Tuesday, May 1, 2012

Drive-by learning through patch reviews

This came up on the linuxwacom-devel list today and I think it warrants further spread through this post.

Different projects have different patch review requirements but the biggest difference is pre-review and post-review. That is, do patches get reviewed before or after they hit the repositories. Not too long ago, the X server employed a post-review process. Everyone with access pushed and bugs would get discovered by those reading commit logs. Patches that ended up on the list were mainly from those that didn't have commit access. Beginning with server 1.8 we introduced a hard review requirement and every patch to make it into the repos ended up on the list, so we switched from post-review to pre-review.

Aside from enforcing that someone gives the formal ACK for a patch, a side-effects is to allow for a passive "drive-by" learning of the code base. Rather than having to explicitly look up commit logs, patches are delivered into one's inbox, outlining where the development currently happens, what it is about and - perhaps most importantly - issues that may have been caused bugs in rejected patches. Ideally that is then archived, so you can link to that discussion later.

The example I linked to from above is automake's INCLUDES versus AM_CPPFLAGS. I wouldn't have know about them if it wasn't for skimming through Gaetan's patches to various X.Org-related projects. That again allowed me to contribute a (in this case admittedly minor) patch to another project. And since that patch ended up on another list, the knowledge can spread on.

Next time when you think of committing directly to a repo, consider sending the patches out. Not just for review, but also to make learning easier for others.

Clickpad kernel bugs in 3.3.x and 3.4

In my last post I talked about Clickpad support in the synaptics driver. Unfortunately, right around the same time a kernel bug surfaced that messed with the events from some clickpads (the Synaptics-branded ones, Apple and others were unaffected). Affected was the 3.3.x series and obviously 3.4. Thanks to +Benjamin Herrenschmidt, that bug was fixed and it is now available in a variety of kernels. The upstream commit is in Linus tree now, still making it into stable (not in 3.3.4 yet). Fedora users can grab Fedora 17 or Fedora 16 kernels that carry this patch.